

Why is this hack helpful?
If you are using the Lifecycle Funnel report to review conversion rates from one Lifecycle to another you will notice that it will not count contacts that have skipped stages. This workflow is a great plug-and-play for any portal to ensure you are collecting as much data as possible.
We'll walk you through setting up the initial workflow setup but remember, you'll need to create separate workflows for each Lifecycle stage to maintain clear and manageable automation.
Step by Step Tutorial
1. Understand how the Lifecycle Funnel report works
The Lifecycle Funnel relies on two key pieces of information:
- Contact History: Has this contact been through a specific lifecycle stage before?
- Timing: When did the contact encounter that particular lifecycle stage?
Knowing this helps us determine which properties to update when building the automation. We also want to avoid overwriting valuable data. Therefore, our workflows will focus on contacts who haven't yet completed certain Lifecycle stages.
Hot Tip 🔥 Before you start, make sure you understand which Lifecycle Stages you use, and what the qualifications for each stage are. For example, a contact is qualified for our Opportunity stage once they have booked a Discovery meeting.
2. Set up a new workflow
To set up your workflow, you will want to go to Automations → Workflows → Create New Workflow → From Scratch. For this example, we are just looking at Contacts, so select the Contact Object during your set-up.
3. Set up your triggers
As we mentioned before, we are only looking at Contacts that have skipped a lifecycle stage, so we want to make sure this is in our triggers.
For this example, let's say we are looking at a Contact who was a Subscriber but has suddenly booked a Discovery Call with us and is now an Opportunity. Therefore, they have now skipped the stages of Marketing Qualified Lead and Sales Qualified Lead.
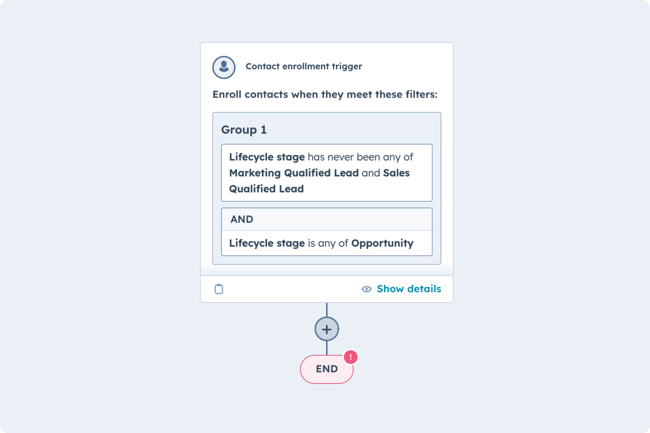
In this example, our workflow trigger will be when this Filter Criteria is Set:
- Lifecycle Stage is: Opportunity
AND - Lifecycle Stage has never been any of:
- Marketing Qualified Lead
- Sales Qualified Lead
4. Create actions that will set your contact as all previous Lifecycle Stages
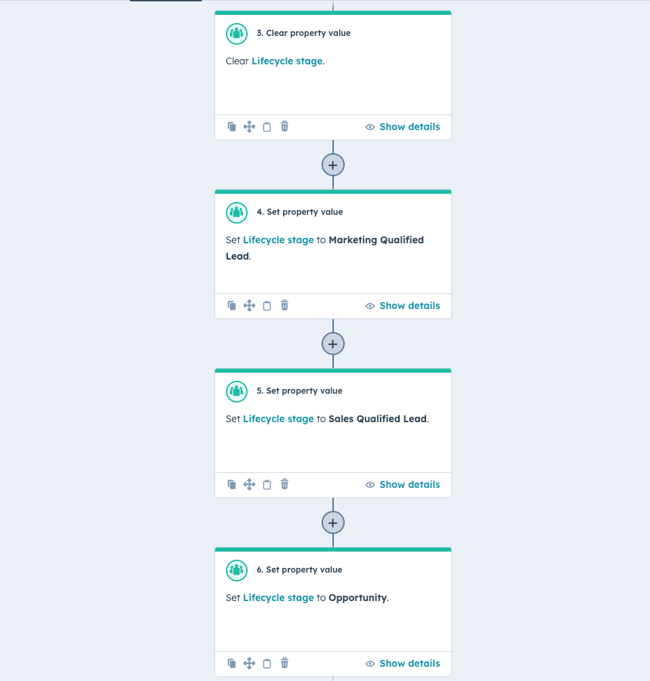
Now comes the actions! And it's pretty straightforward - contacts cannot move backwards in Lifecycle stages through automation so we are first going to clear the Lifecycle stage and then push our Contact into the Marketing Qualified Stage, Sales Qualified stage and finally back into the Opportunity stage.
This will happen in quick succession, and automatically set the times relevant to when the action happened.
When creating the action on the right hand side you will want to go to:
CRM → Clear Property Value → Set Property Value → Lifecycle Stage → Select the first Lifecycle stage.
Then repeat and clone that bad boy, changing the Lifecycle stage until all previous Lifecycle stages have been considered! In the end, your first workflow shoud look a little something like this.
4. Turn On Your Workflow
That's it! Simply turn your workflow on and you're ready to go. Remember you will create a similar workflow every single Lifecycle stage that has several stages before it. The workflow will change depending on where the contact is in the process.


 1300 71 61 41