

Automate Client Check-Ins for HubSpot Partnership Work
Set up a HubSpot workflow that checks in with your own customers on a schedule, so it happens without anyone having to remember to do it, and stays inside the Spam Act's rules on consent.

Why bother automating this
If check-ins with your customers only happen when someone remembers, they happen unevenly: some accounts get a call every few weeks, others go quiet for months until a renewal conversation forces the issue. That's not a relationship problem, it's a process gap, and it's exactly the kind of thing a HubSpot workflow can close.
Automating the check-in means a deal or account gets its next touchpoint on schedule, without depending on whoever owns it to remember, and gives you a consistent record of when each customer was last actually contacted.
Before you build the sequence, it's worth knowing what governs it. Under the Spam Act 2003, ACMA draws a line between express consent, where the customer has actually agreed to receive this kind of communication, and inferred consent, which only applies where they knowingly gave you their details directly and it's reasonable they'd expect to hear from you as a result of an existing relationship. The burden of proving that consent exists sits with you as the sender, not the customer, so an ongoing check-in sequence needs a real basis, an active engagement or contract, not just a contact record sitting in your CRM.
Step-by-step setup
1. Design your check-in and follow-up emails
Start by designing the email templates that go out when the time is right. These should sound like you, not like a template, and should include real, specific details about the account rather than generic filler.
Do your retainer clients only hear from you at renewal?
The quiet accounts are usually the ones that churn first.
In HubSpot, go to Marketing → Email. Use an existing template or build a new one, and make sure it's set as an Automated email before you publish it.
2. Create a custom property for check-in dates
To automate the check-ins, you need a custom property that tracks the next check-in date for each account. Go to Settings → Properties → Create a property. Name it something like "Next Check-In Date" and set the field type to Date Picker. Put this property on the Deal object.
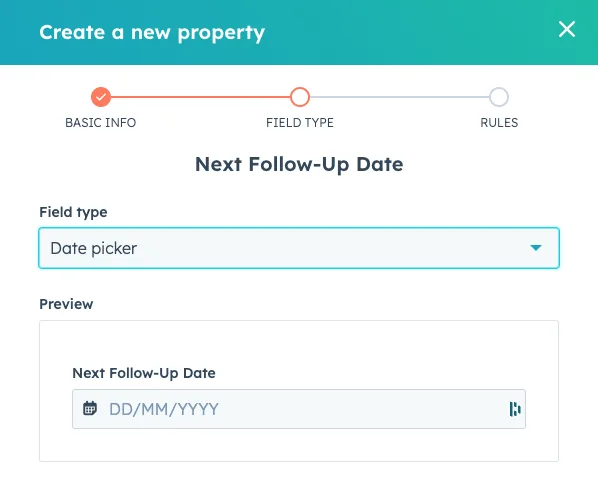
Make this property required at the relevant point in the deal pipeline, typically when the deal is marked won, so it actually gets filled in rather than left blank.
3. Set up the workflow trigger
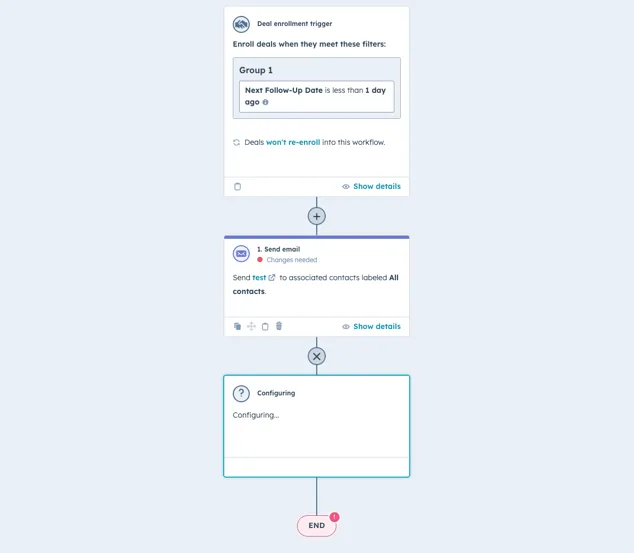
Go to Automation → Workflows → Create workflow, choose "Start from scratch" and select "Deal-based." Set the enrolment trigger to the custom property "Next Check-In Date" being "less than 1 day ago," and turn on re-enrolment so the check-ins keep firing on schedule rather than only once.
4. Define the workflow actions
Once the trigger fires, the workflow should:
- Send the check-in email you built in step one.
- Create a task for the account owner to update the next check-in date, so the cycle continues.
5. Monitor and adjust
Review the workflow regularly to confirm it's still doing what you intended. Go to Reports → Analytics Tools → Workflow performance, and check open rates, click-through rates and response rates, then adjust the timing and content of the emails based on what the data and actual customer feedback tell you.
Where to take this next
Not sure which check-ins should stay human?
Every retainer has one client who would spot a template.
The same follow-up pattern works from a playbook submission, and notifying every relevant owner the moment a deal changes pairs well with this if more than one person touches the account. If you're scoping the wider partnership this check-in workflow sits inside, here's how ongoing HubSpot partnership work actually gets scoped in Australia.
Want help building this or the automation around it? Here's our RevOps and HubSpot work, or get in touch.